You spent $30 on a soil test, waited two weeks for the results, opened the report, tried to read it, and now you're staring at 16 numbers that mean absolutely nothing to you. Half of them are red. Something called CEC is a number you've never heard of. Your pH is 4.91 and you don't know if that's good or catastrophic. (It's catastrophic.) This is the guide that turns that confusing report into a clear action plan.
For Long Island homeowners reading a soil test for the first time,
- Start with pH. It's the master switch. If pH is below 6.0, fix it with lime before touching anything else. At low pH, other nutrients are locked in the soil and unavailable to grass.
- Then check the Big 3: nitrogen, phosphorus, potassium (N-P-K). These drive growth, roots, and stress resistance. Deficiencies here show up as thin, pale, weak turf.
- Then secondary nutrients: calcium, magnesium, sulfur. These affect soil structure, chlorophyll, and protein building.
- Micronutrients last: iron, manganese, zinc, copper, boron. Deficiencies are rarer but cause specific visible symptoms.
- Fix in order. pH first, macronutrients second, micros third. Many "deficiencies" self-correct once pH reaches the 6.0 to 7.0 range.
A Real Soil Test: What We're Working With
Instead of talking in hypotheticals, let's look at an actual soil test from a Long Island backyard (USDA Zone 7B, sandy outwash soil, tested March 2026 with a MySoil Test Kit). This is a real report from a real lawn. Your results will look similar if you're on typical Long Island sand that hasn't been amended in years.
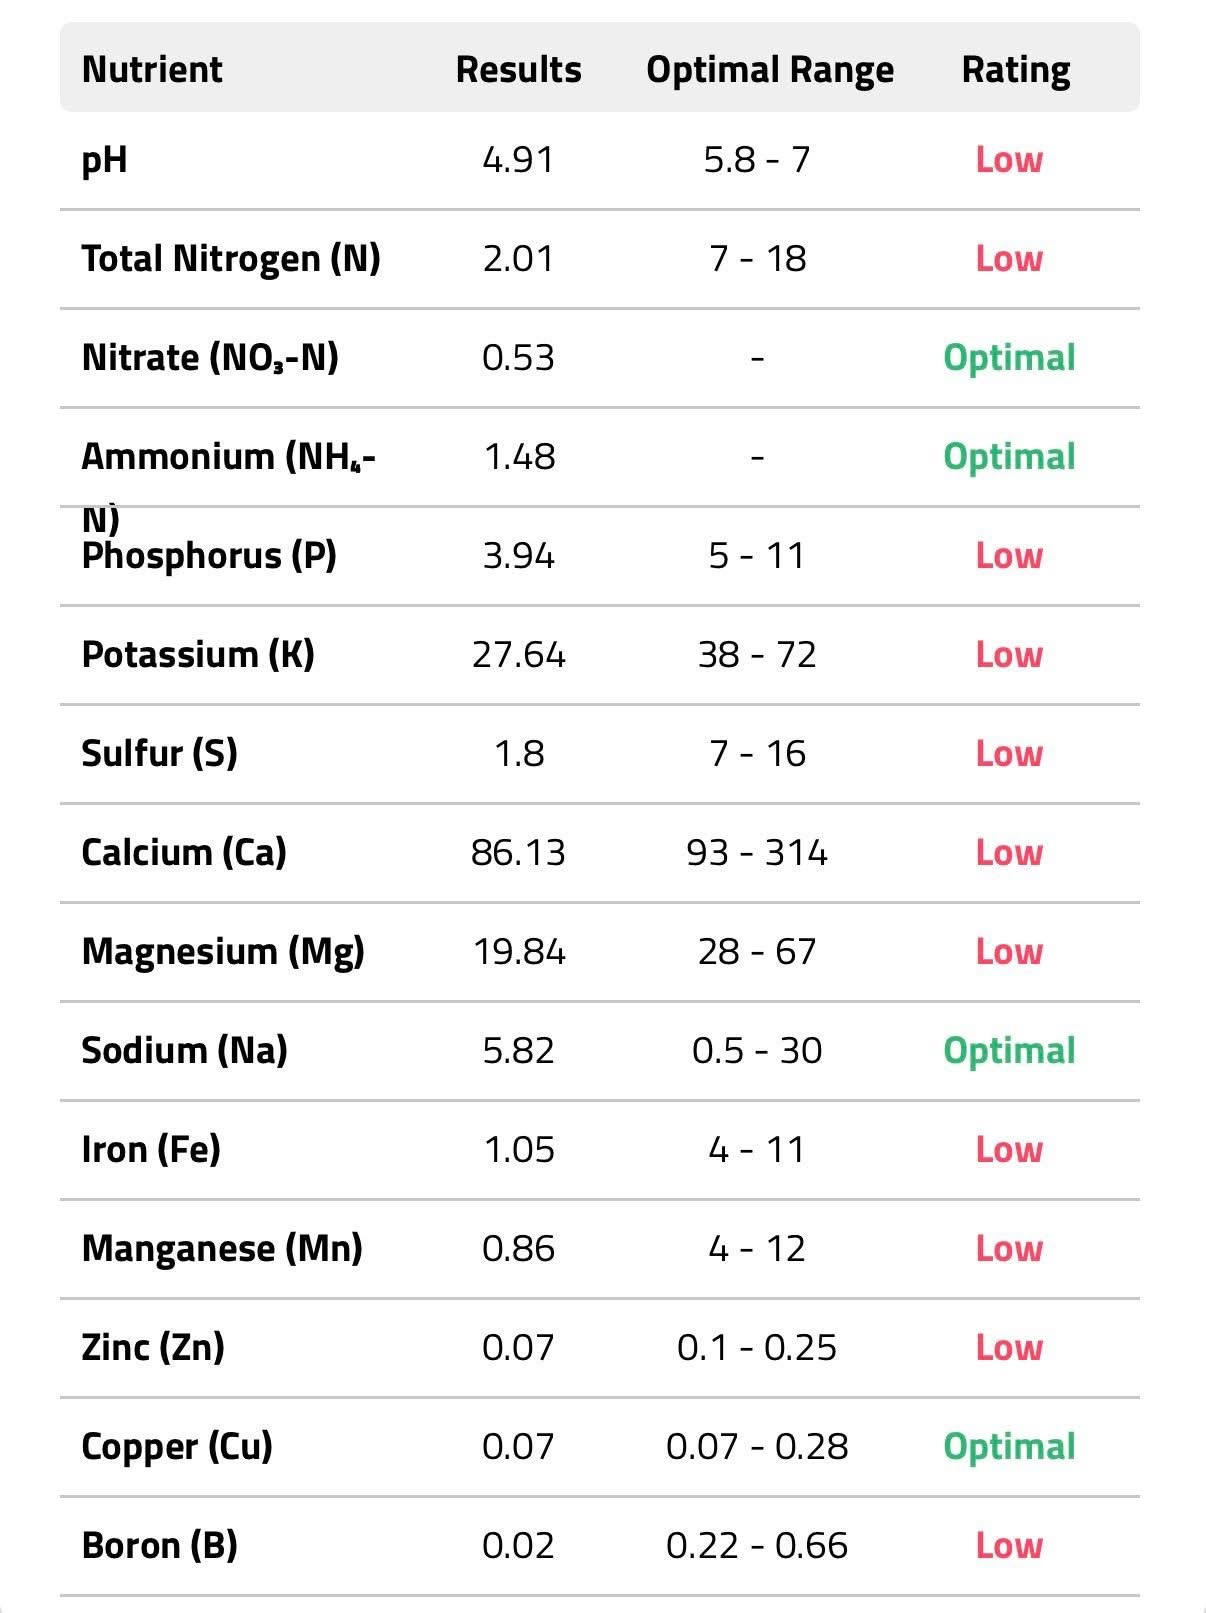
Sixteen lines on the report. Eleven came back Low. Only four (nitrate, ammonium, sodium, copper) rated Optimal. Total Nitrogen was Low even though nitrate and ammonium individually were Optimal, because total N combines all nitrogen forms and yours is still below the threshold. That might look terrifying, but here's the thing most people miss: many of these deficiencies share a single root cause. Fix that root cause and half the red numbers turn green on the next test without adding a single product.
pH: The Master Switch (Read This First)
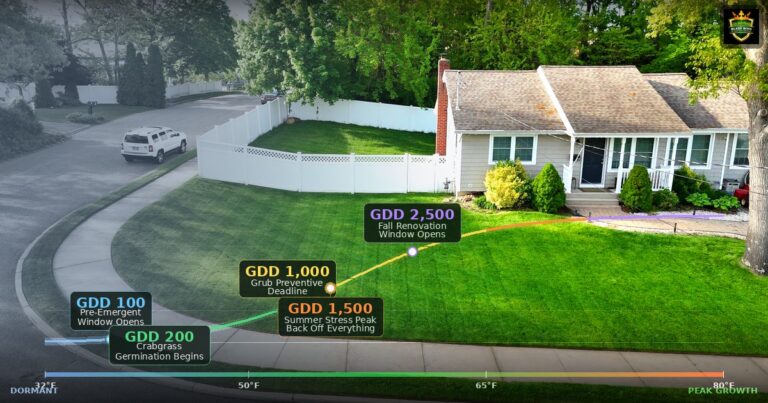
If you only understand one number on your soil test, make it pH. Everything else is secondary. pH measures how acidic or alkaline your soil is on a scale from 0 (pure acid) to 14 (pure alkaline), with 7.0 being neutral. Cool-season lawn grasses perform best between 6.2 and 6.8. Our Dynamic Calendar tracks these windows automatically with GDD alerts. Our Stripe Master members get the complete 15-step Lawn Playbook that covers exactly this.
Here's why pH matters more than any individual nutrient: pH controls the availability of nutrients in the soil. Phosphorus, calcium, magnesium, and most micronutrients can be physically present in your soil but chemically locked up at low pH. Your grass roots literally cannot access them. It's like having food in a locked refrigerator with no key.
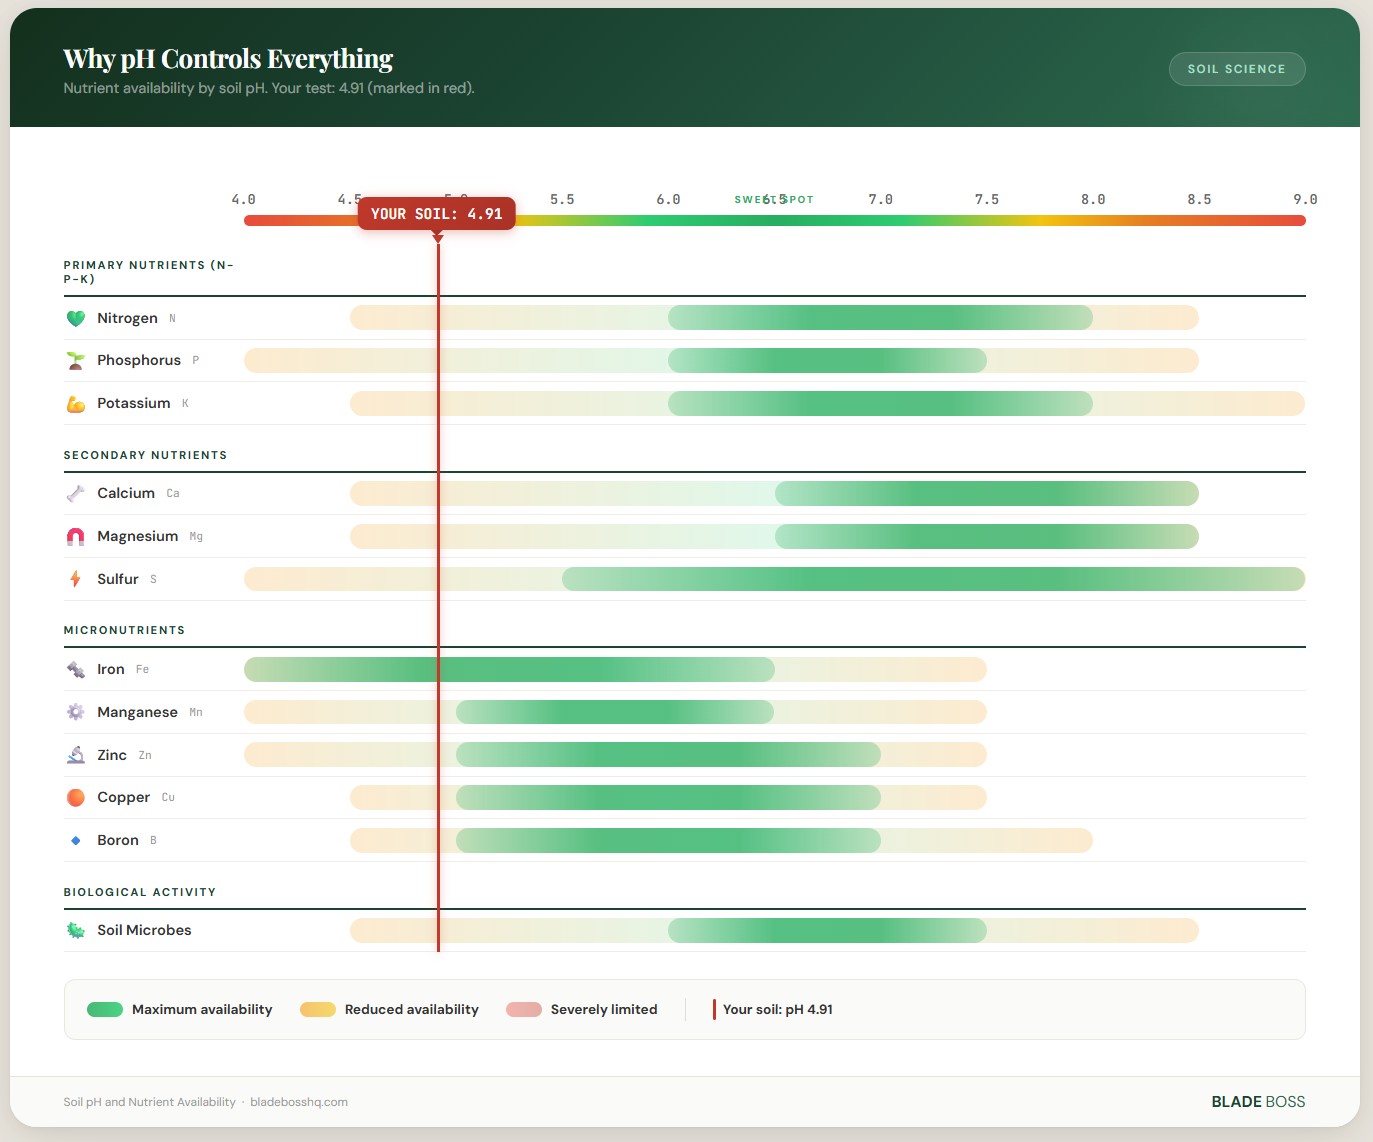
At this pH, your soil is actively working against your lawn. Phosphorus becomes bound to aluminum and iron compounds, making it unavailable. Calcium and magnesium leach out of sandy soil faster than they can be replenished. Beneficial soil microbes that break down thatch and cycle nutrients begin dying off. Aluminum toxicity risk increases, potentially poisoning grass roots. And every dollar you spend on fertilizer delivers maybe 40 to 60 cents of actual value because the grass can't absorb nutrients efficiently.
The fix: lime. Calcitic lime (calcium carbonate) or dolomitic lime (calcium + magnesium carbonate) raises pH over time. How much you need depends on your current pH, your target pH (6.5), your soil type, and your CEC (we'll cover that). On Long Island's sandy soil with low CEC, pH changes happen faster than on clay, but the amounts still need to be calculated precisely. Guessing leads to overshooting.
If your pH is below 6.0, apply lime before spending money on any other amendment. Wait 3 to 6 months for initial movement (full effect takes 1 to 2 years) for the lime to react, then retest. You'll be surprised how many nutrient deficiencies disappear once pH reaches the right range. The nutrients were there all along. They were just locked up.
The Big Three: Nitrogen, Phosphorus, Potassium (N-P-K)
These three nutrients are the ones your lawn uses in the largest quantities. They're the reason fertilizer bags have three numbers on them (like 24-0-11). Each one does something completely different.
Nitrogen (N): The Growth Engine
Nitrogen is what makes grass green and makes it grow. It's the most consumed nutrient and the one most frequently deficient. Low nitrogen shows up as pale yellow-green color, thin weak turf that can't outcompete weeds, and slow recovery from foot traffic and mowing.
Here's the catch: nitrogen is not really a "fix it with amendments" nutrient. Unlike pH or potassium, nitrogen doesn't accumulate in soil. It's water-soluble and constantly cycling through the system. Soil test nitrogen numbers are a snapshot of one moment in time and change dramatically with temperature, rainfall, and microbial activity. That's why nitrogen is managed through a seasonal fertilizer schedule rather than a one-time correction.
Phosphorus (P): The Root Builder
Phosphorus drives root development and energy production (ATP) at the cellular level. Low phosphorus means weak, shallow roots, purple-tinged leaves, and poor establishment of new grass from seed. Our test shows 3.94 ppm against an optimal range of 5 to 11.
Get a printable quick-reference card that explains every number on your soil test report.
Important legal note for Long Island: New York State law prohibits phosphorus in lawn fertilizer unless a soil test shows a deficiency. This is exactly why soil testing matters. Our test shows Low phosphorus, which legally allows us to apply a phosphorus-containing product. Without the test, you'd be breaking the law if you applied a fertilizer with phosphorus. The law exists because Long Island's sole-source aquifer is vulnerable to phosphorus runoff that causes algal blooms in bays and harbors.
Potassium (K): The Stress Shield
Potassium is your lawn's immune system. It regulates water movement within the plant, strengthens cell walls, activates enzymes, and builds resistance to drought, disease, and cold. Low potassium (27.64 ppm vs. optimal 38 to 72) shows up as brown leaf edges (marginal scorch), increased disease pressure, wilting under mild drought that wouldn't affect a healthy lawn, and poor winter survival.
On Long Island's sandy soil, potassium is one of the hardest nutrients to build up because it leaches fast. The soil's low CEC (cation exchange capacity, which we'll break down in its own section below) can't hold onto positively charged potassium ions, so they wash down with every rain and irrigation event. Correcting potassium on sand requires higher application rates than on clay (up to 5x the stoichiometric amount on pure sand) and split applications to prevent leaching.
Secondary Nutrients: The Support Crew
After pH and the Big Three, these three nutrients play critical supporting roles.
| Nutrient | What It Does | When It's Low | Our Test Result |
|---|---|---|---|
| Calcium (Ca) | Builds strong cell walls, improves soil structure, helps roots penetrate | Grass tears easily, poor root growth, soil structure breaks down | 86.13 ppm (Low, optimal 93 to 314) |
| Magnesium (Mg) | Center of every chlorophyll molecule, drives photosynthesis | Yellow between veins on older leaves, poor color despite adequate nitrogen | 19.84 ppm (Low, optimal 28 to 67) |
| Sulfur (S) | Builds amino acids and proteins, contributes to dark green color, lowers pH | Uniform yellowing on new growth (looks like N deficiency), weak disease resistance | 1.80 ppm (Low, optimal 7 to 16) |
Here's the good news if your calcium is low: when you apply lime to raise pH (which is almost certainly your first correction step on Long Island's acidic sand), you're adding calcium as a byproduct. Calcitic limestone is roughly 40% calcium by weight. So fixing your pH simultaneously fixes your calcium deficiency. This is not a coincidence. Acidic soils are almost always calcium-deficient because the same conditions that lower pH (hydrogen ions displacing calcium on soil particles) are what cause calcium to leach away. One correction, two problems solved.
Here's the good news about calcium and magnesium: if you're applying lime to raise pH (which this test demands), lime is calcium carbonate. Dolomitic lime is calcium + magnesium carbonate. One product fixes three problems at once: pH, calcium, and magnesium. This is why the correction order matters. Don't buy separate calcium and magnesium supplements when lime delivers both as a side effect of the pH correction you already need.
See Your Full Correction Plan in Lawn Map Pro
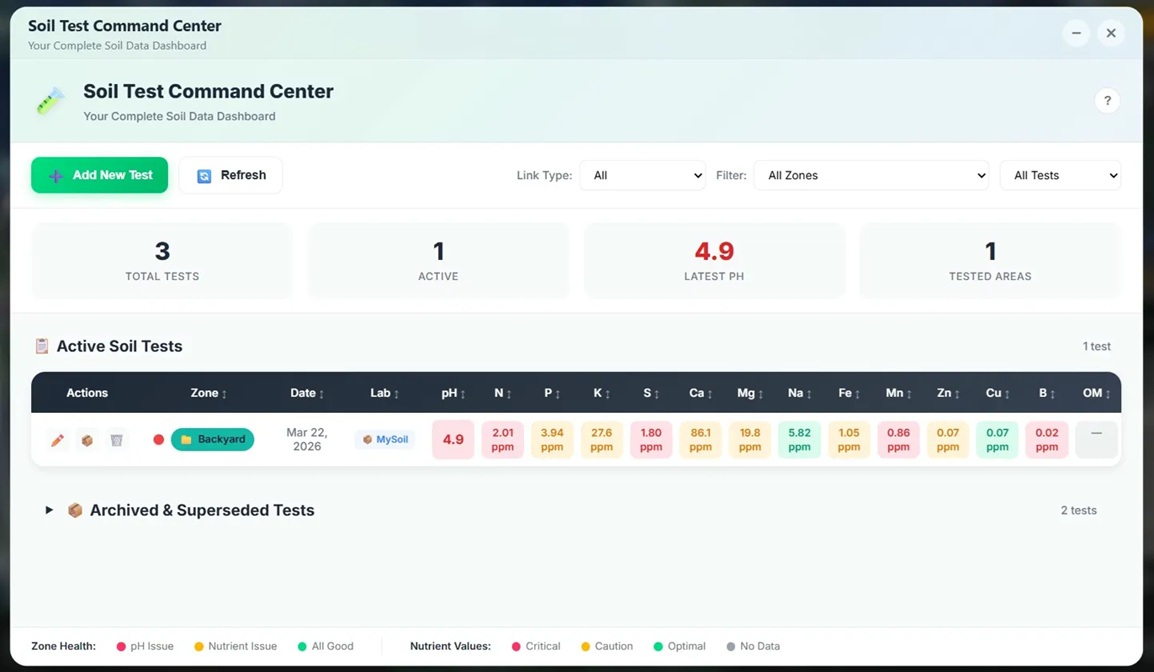
Enter your soil test results into the Blade Boss Soil Test Command Center and our patent-pending Soil Correction Engine calculates exact product rates, application sequences, and scheduling with conflict-aware timing.
Micronutrients: The Fine Tuning
Your lawn needs these in tiny amounts, but deficiencies cause specific, visible symptoms. Think of micronutrients like vitamins: you don't need much, but zero causes problems.
| Micronutrient | Role | Deficiency Symptom | Our Result |
|---|---|---|---|
| Iron (Fe) | Chlorophyll production, green color | Yellowing of new growth (interveinal chlorosis) while veins stay green | 1.05 ppm (Low) |
| Manganese (Mn) | Enzyme activation, photosynthesis | Gray-green or tan spots between leaf veins | 0.86 ppm (Low) |
| Zinc (Zn) | Growth hormones, enzyme function | Stunted new growth, small leaves | 0.07 ppm (Low) |
| Copper (Cu) | Enzyme systems, lignin production | Wilting of new growth even with adequate water | 0.07 ppm (Optimal) |
| Boron (B) | Cell wall integrity, calcium transport | Thickened, brittle leaf tips, poor root growth | 0.02 ppm (Low) |
Most micronutrient deficiencies on Long Island are caused by low pH, not actual absence of the nutrient. Iron, manganese, zinc, and boron all become less available as pH drops below 6.0. Fix pH first, retest, then address any remaining micronutrient gaps. Applying iron supplements to pH 4.9 soil is like putting premium gas in a car with no engine oil. You're treating a symptom, not the cause.
CEC: Your Soil's Nutrient Bank Account
CEC stands for Cation Exchange Capacity. If you've never heard of it, you're not alone. But it's one of the most useful numbers on a soil test because it tells you how well your soil can hold onto nutrients.
Think of CEC like a bank account. High CEC soil (clay, organic-rich loam) has a big account that holds nutrients for weeks. Low CEC soil (sandy, like Long Island) has a small account that drains with every rain. Typical Long Island sandy soil has a CEC of 3 to 12, compared to Midwest clay at 15 to 30+.
Why this matters practically: on low CEC soil, you can't dump a year's worth of amendments in one shot. They'll leach before the grass uses them. You need smaller, more frequent applications. It's the same reason we split fertilizer into 4 to 5 rounds instead of one: the soil can't hold that much at once.
The Correction Order: What to Fix First
Looking at a report with 11 Low ratings is overwhelming. But you don't fix everything at once, and you don't fix them in random order. There's a science-backed sequence.
Fix pH First (Always)
If pH is below 6.0, apply lime. The amount depends on your current pH, target pH, soil type, and CEC. This isn't a "throw a bag of lime on the lawn" situation. Our pH guide covers the science. Lime takes 3 to 6 months to fully react. Apply in fall or early spring.
Wait and Retest After pH Correction
Many nutrient deficiencies will self-correct once pH reaches 6.0 to 7.0 (target 6.5). The nutrients were always in the soil. They were just chemically unavailable. Retesting after pH correction prevents you from buying supplements you don't need.
Address Remaining Macronutrient Deficiencies
If phosphorus, potassium, calcium, magnesium, or sulfur are still low after pH correction, now is the time to address them. Each requires specific products at specific rates.
Fine-Tune Micronutrients if Needed
Iron, manganese, zinc, boron, and copper deficiencies that persist after pH correction can be addressed with targeted micronutrient products. Most homeowners never need this step.
Maintain with Annual Testing
Soil chemistry is not "fix it and forget it." Sandy soil loses nutrients continuously through leaching. Annual testing catches drift before it becomes a visible problem.
The Math Problem Nobody Talks About
Here's where soil correction gets genuinely hard, and where most DIY homeowners get lost: calculating how much of each product to apply. It's not as simple as "pH is low, add lime."
Join Long Island homeowners who get data-driven lawn care tips every week. Seasonal reminders, timing alerts, and the stuff your lawn service won't tell you.
To calculate a lime rate, you need your current pH, your target pH (6.5), your soil texture (sand/loam/clay), your CEC or buffer pH, and a lookup table calibrated to your soil type. To calculate a potassium correction, you need the deficit in ppm, a conversion factor for your sampling depth, an efficiency multiplier that accounts for leaching (which changes by soil type), and an oxide conversion factor to translate elemental K into the K2O on product labels. Multiply those four numbers wrong and you either undershoot (wasted test) or overshoot (wasted money, possible damage).
This is exactly the problem we built the Blade Boss Soil Correction Engine to solve. It's a patent-pending 10-step calculation pipeline that reads your soil test, pulls correction targets from our Zone Science database, calculates exact product rates adjusted for your soil type, CEC, and sampling depth, sequences the applications to avoid product conflicts, and generates a week-by-week plan. No guessing. No spreadsheets. No trying to reverse-engineer a Cornell Extension bulletin at 11 PM.
Get Your Exact Correction Plan
Upload your soil test to the Blade Boss Soil Test Command Center. Our patent-pending Soil Correction Engine runs a 10-step pipeline: pH correction, deficit calculations, product selection, conflict checking, and week-by-week scheduling. Built on university extension research from Cornell, Rutgers, Penn State, and more, calibrated to Long Island's glacial outwash soils.
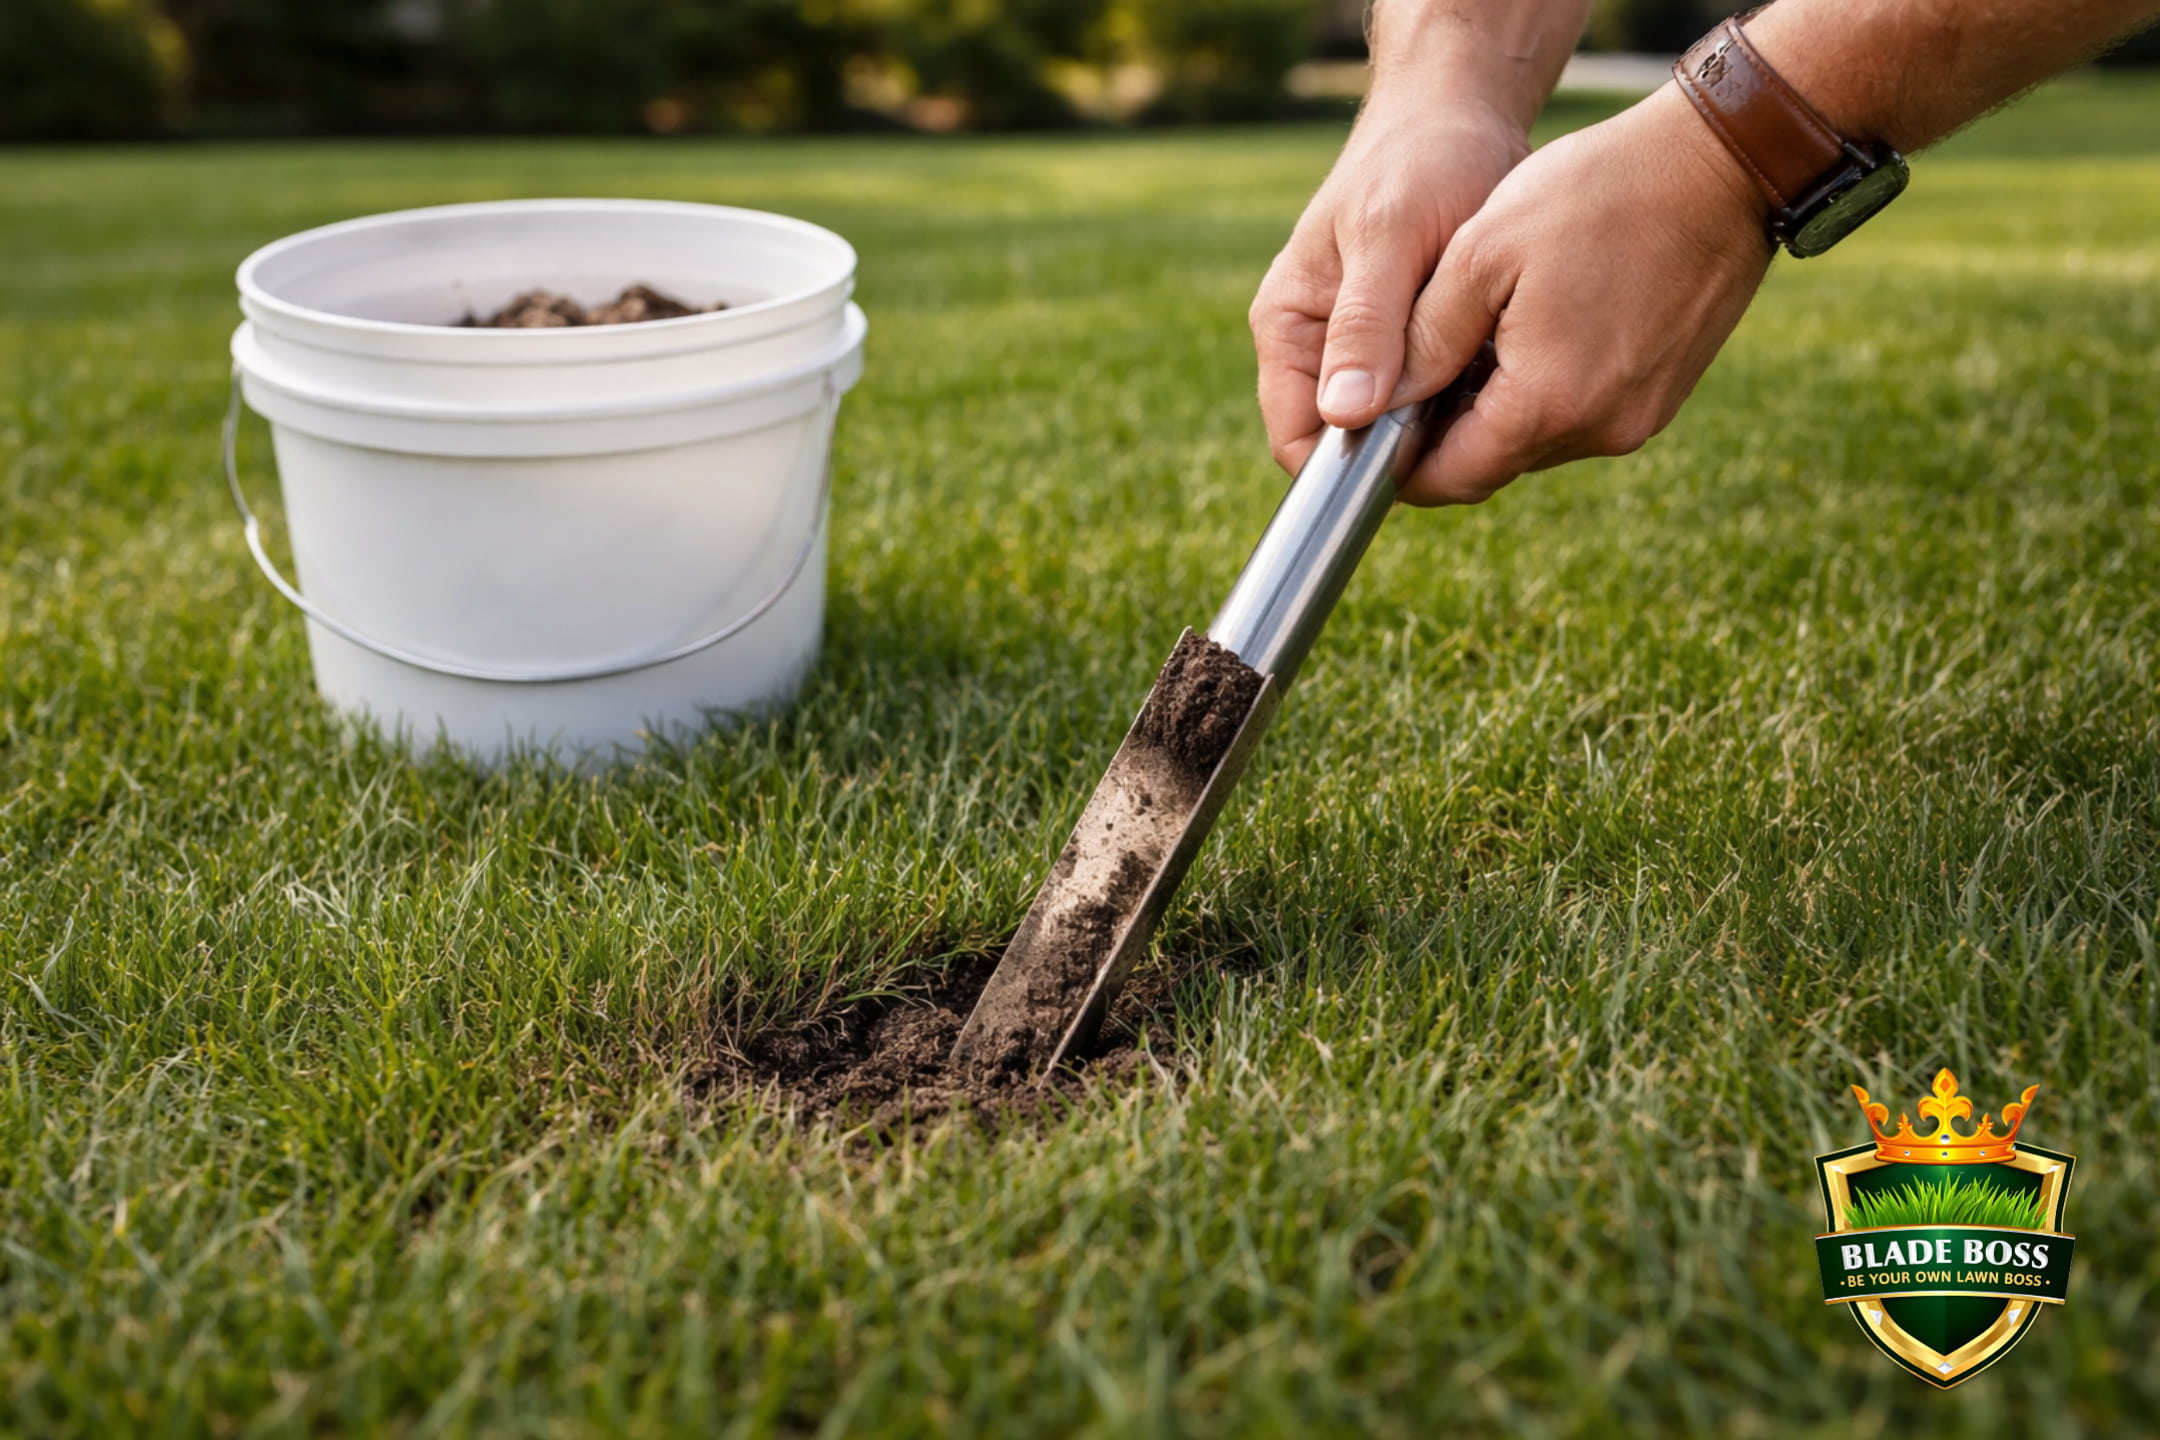
How to Collect a Soil Sample That Actually Represents Your Lawn
Bad samples give bad results. A soil test is only as good as the sample you send to the lab. Here's how to do it right.
Gather a Clean Bucket and a Shovel or Soil Probe
Avoid galvanized or brass tools (zinc and copper contamination). A stainless steel trowel or soil probe is ideal. A clean plastic bucket works for mixing. Use plastic or food-grade containers only. Metal buckets (especially galvanized steel) can leach zinc, iron, and other metals into your sample and skew your micronutrient results.
Take 8 to 12 Sub-Samples from Across the Lawn
Walk a random zigzag pattern. At each spot, push the probe or trowel to a depth of 4 to 6 inches. Avoid unusual areas: fence lines, pet spots, under trees, next to driveways. You want a representative average, not an outlier.
Remove the Top Layer of Grass and Thatch
Peel off the top half-inch of grass and thatch. You're testing soil, not decomposing plant material. Include only the mineral soil below the organic layer.
Mix All Sub-Samples in the Bucket
Combine all 8 to 12 cores in the bucket and mix thoroughly. This composite sample averages out the natural variation across your lawn. One spot might be pH 5.2 and another 5.8. The mix gives you the true average.
Fill the Test Kit Bag or Container
Take about 1 cup of the mixed soil and put it in the sample bag that came with your test kit. If sending to a university lab, follow their specific instructions for drying and packaging. Label the sample with the zone name (front yard, backyard, etc.).
Test Different Zones Separately
If your front yard is full sun and your backyard is mostly shade, test them as separate samples. They likely have different soil chemistry. The Blade Boss Lawn Map Pro tool lets you draw zones on satellite imagery and track soil tests per zone.
MySoil Test Kit
Lab-grade results for pH and 13 nutrients. Collect your sample, mail it in the prepaid envelope, get results in 6 to 8 business days on your phone. About $30. This is the test that produced the results in this article.
Check Price on AmazonNutrient Interactions: Why Everything Affects Everything
Soil nutrients don't exist in isolation. They interact in ways that matter. Understanding a few key interactions helps you make sense of your test results and avoid making one problem worse while fixing another.
| Interaction | What Happens | Why You Should Care |
|---|---|---|
| High Ca blocks K and Mg | Excess calcium antagonizes potassium and magnesium uptake | If you over-lime, you can induce K and Mg deficiency even if those nutrients test normal. |
| High K blocks Mg | Excess potassium interferes with magnesium absorption | Heavy potassium applications without checking Mg can cause yellowing despite adequate Mg in soil. |
| Low pH locks out P, Ca, Mg | Below pH 5.5, phosphorus binds to aluminum/iron. Ca and Mg leach faster. | This is why our test shows Low for all three. The pH of 4.91 is the root cause. |
| High P locks out Fe, Zn, Mn | Excess phosphorus ties up micronutrients | Over-applying phosphorus (common from years of "starter fertilizer") creates iron chlorosis. |
| Ca:Mg ratio matters | Higher Ca relative to Mg is generally preferred | Our test: 86/20 = 4.3:1 (too much Mg relative to Ca). Dolomitic lime might worsen this. |
- Your results: Ca at 86 ppm and Mg at 20 ppm (ratio 4.3:1).
- What this means: You have proportionally more magnesium relative to calcium than typical.
- The practical decision: Use calcitic lime (calcium only) to raise pH, not dolomitic lime (which would add even more magnesium).
- Why it matters: Excess magnesium relative to calcium can tighten soil structure and reduce drainage. On Long Island sand this is less of a problem, but choosing the right lime type is still free optimization.
What Your Soil Test Doesn't Tell You
It doesn't tell you about soil biology
Soil tests measure chemistry (nutrient levels, pH), not biology (microbial populations, fungal networks, organic matter decomposition rates). A soil with perfect chemistry but dead biology still performs poorly. Building organic matter through aeration, proper mowing, and leaving clippings on the lawn feeds the biological community that makes chemistry work.
It doesn't tell you about soil structure
Compaction, drainage, and infiltration rate are physical properties that a chemical test doesn't measure. You can have perfect nutrient levels and pH but compacted soil that won't let water or roots penetrate. That's what core aeration fixes.
Nitrogen is a snapshot, not a trend
Nitrogen levels change daily with temperature, moisture, and microbial activity. A soil test nitrogen reading tells you what was in the soil the moment the sample was collected. A week later, that number could be completely different. This is why nitrogen is managed through a seasonal schedule based on grass type and growing degree days, not a one-time soil test correction.
Lab methods affect the numbers
Different labs use different extraction methods (Mehlich-3, Morgan, resin capsule). The raw ppm numbers from a MySoil resin kit are NOT directly comparable to Mehlich-3 numbers from a university lab. Each method has its own optimal ranges. Our Soil Correction Engine detects the lab type and applies the correct reference ranges automatically.
Your Next Steps (In Order)
- Read pH first. Below 6.0? Lime is your first purchase. Above 7.0? Elemental sulfur.
- Check P, K, Ca, Mg, S. Note which are Low. Don't buy anything yet.
- Consider the pH connection. If pH is low AND multiple nutrients are low, pH correction will likely fix several at once.
- Upload to Blade Boss for an exact correction plan with product rates, application sequence, and timing. Or bring results to your local Cornell Cooperative Extension office.
- Apply lime if needed. Fall or early spring. Split into multiple applications for large lime requirements. Our correction engine calculates the exact split.
- Wait 3 to 6 months for initial movement. Lime takes time to react. Don't pile on other amendments during this period.
- Retest. Compare results. Address remaining deficiencies with targeted products.
- Test annually. Sandy Long Island soil shifts constantly. One test per year keeps you ahead of problems.
The Whole System Starts With the Test
Every guide in the Blade Boss library connects back to soil test data. Your fertilizer schedule should be calibrated to your actual nitrogen need, not a generic bag rate. Your pH correction plan depends on your actual pH and CEC. Whether you need phosphorus in your pre-emergent depends on your P test. Clover invasion is a symptom of low nitrogen. Crabgrass fills in where thin turf can't compete. Irrigation water slowly shifts your soil pH over time. It all starts with the test.
For grass type selection, soil test data tells you if your soil can support the higher fertility demands of KBG or if TTTF is the smarter choice. The Blade Boss Calendar times your amendments to the biological windows where they're most effective. And our Zone 7B master guide ties everything together with university extension research and Zone 7B soil science. Cool-season turfgrass research from Rutgers NJAES applies directly to Long Island growing conditions. Penn State Extension offers additional cool-season grass management resources for the Northeast.
Chris C. is a Combat Search and Rescue pilot turned airline pilot and the founder of Blade Boss. The Soil Correction Engine referenced in this article is a patent-pending system built on university extension research (Cornell, Rutgers, Penn State, Ohio State) and calibrated to Long Island's glacial outwash soils with university extension research. Get a MySoil Test Kit and upload your results to see it in action.
See what Blade Boss members get and get instant access to the Soil Test Command Center, preview our correction tools, and see what data-driven lawn care looks like.
See Plans →Frequently Asked Questions
What is the most important number on a soil test for lawns?
Soil pH is the single most important number on your soil test. pH controls the availability of virtually every other nutrient in the soil. At a pH of 4.9 (common on untreated Long Island sand), phosphorus, calcium, magnesium, and most micronutrients are chemically locked up and unavailable to grass roots, even if those nutrients are present in the soil. Correcting pH to the 6.0 to 7.0 range for cool-season grass unlocks nutrients you already have and makes every fertilizer application more effective.
How often should I test my lawn soil?
Test your soil once per year, ideally in fall (September or October) after the growing season ends. This gives you winter to plan corrections and order products before the spring application window opens. If you applied lime or sulfur to correct pH, retest 6 to 12 months later to measure progress. New homeowners or anyone who has never tested should test immediately regardless of season. The results take 1 to 3 weeks depending on the lab.
What soil test kit should I use for my lawn?
For homeowners, the MySoil Test Kit provides lab-grade results for pH and 13 nutrients (N, P, K, S, Ca, Mg, Na, Fe, Mn, Zn, Cu, B, and organic matter) for about $30. You collect a sample, mail it in a prepaid envelope, and get results in 6 to 8 business days via an app. For more precise Mehlich-3 extraction results, send samples to a state university extension lab like Cornell (through your local Cooperative Extension office) or Rutgers Soil Testing Lab. University labs cost $15 to $25 and provide crop-specific recommendations.
What does it mean when my soil test says Low for everything?
If most nutrients show Low, your soil likely has very low pH (acidic) and low organic matter. This is extremely common on Long Island sandy soils where native pH ranges from 4.5 to 5.5. At low pH, nutrients become chemically locked in the soil and unavailable to plants. Fix pH first with lime before adding any other amendments. Once pH reaches 6.0 to 7.0 (target 6.5), many nutrient deficiencies correct themselves because the nutrients were already in the soil but locked up. Retest after pH correction before spending money on individual nutrient supplements.
Can I just add fertilizer instead of doing a soil test?
No. Fertilizing without a soil test is like taking random medication without a diagnosis. You might add nutrients your soil already has (wasting money and potentially causing environmental harm), while ignoring the actual problem. For example, if your pH is 4.9, adding nitrogen fertilizer is almost pointless because the grass cannot efficiently absorb nutrients at that pH. New York State law also prohibits phosphorus in lawn fertilizer unless a soil test shows a deficiency. A $30 soil test saves hundreds in wasted products.
What does CEC mean on a soil test and why does it matter?
CEC stands for Cation Exchange Capacity. Think of it as your soil's nutrient bank account. It measures how well the soil can hold onto positively charged nutrients like calcium, magnesium, and potassium. Sandy Long Island soils typically have a CEC of 3 to 12, which is low compared to clay soils (15 to 30+). Low CEC means nutrients wash through the soil faster with rain and irrigation, so you need to apply amendments in smaller, more frequent doses rather than one large application. CEC also determines how much lime is needed to change pH.
Keep Reading
 DIY How-To
GDD Explained: The Secret to Perfect Lawn Timing
Growing degree days (GDD) predict exactly when to apply pre-emergent, fertilize, and treat for pests on your lawn....
 DIY How-To
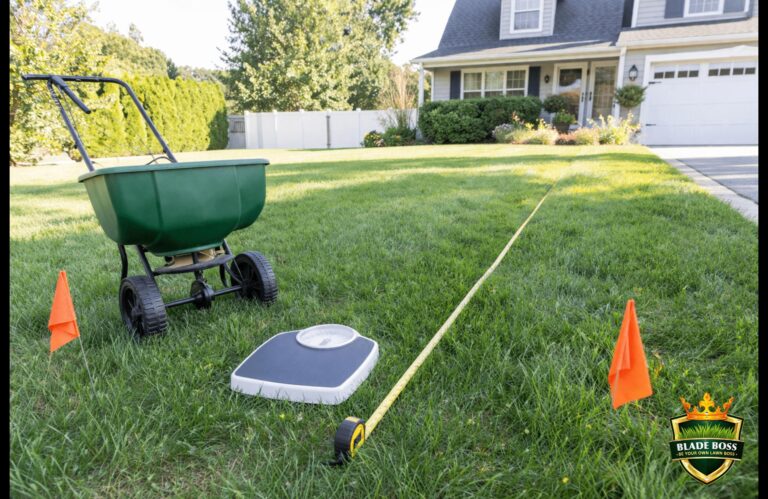
How to Calibrate a Broadcast Spreader in 10 Minutes (The Method That Actually Works)
The 25-foot calibration method takes 10 minutes, a bathroom scale, and zero guesswork. Stop trusting bag settings. Start...
 DIY How-To
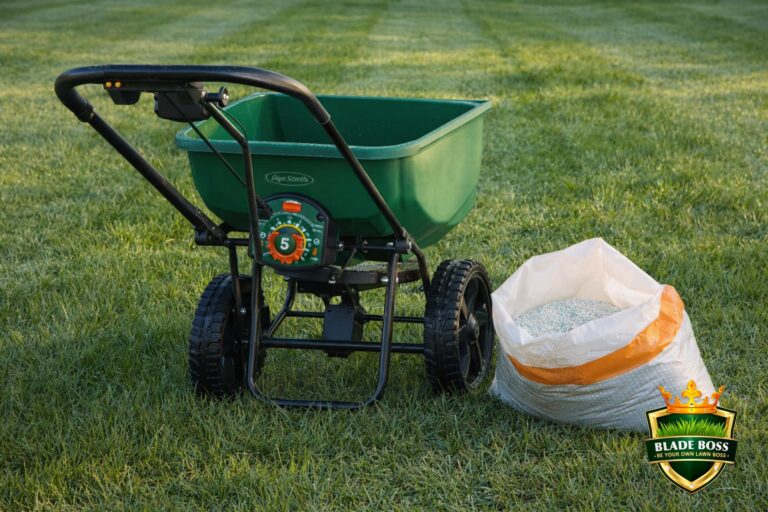
Best Spreader Settings for Scotts, Lesco, and Echo Spreaders
Bag settings are starting points, not guarantees. Here are verified label settings for 9 common products, the SiteOne...
Level Up Your Lawn Game
20+ pro calculators, satellite lawn mapping, and USDA zone-specific schedules. Built for Long Island and Northeast homeowners.
Create a free account to join the conversation.