Drought-Proofing Your Long Island Lawn: 8 Things to Do Before July
Your lawn looks great right now. May on Long Island is peak growing season. Deep green, thick, growing fast. It feels like the easy part. It is the easy part. But in 6 to 8 weeks, air temps will push into the high 80s and 90s, your sandy soil will drain every drop of water in 48 hours, and your grass will shift from growing to surviving. What you do in the next 6 weeks determines whether your lawn cruises through July or collapses in it.
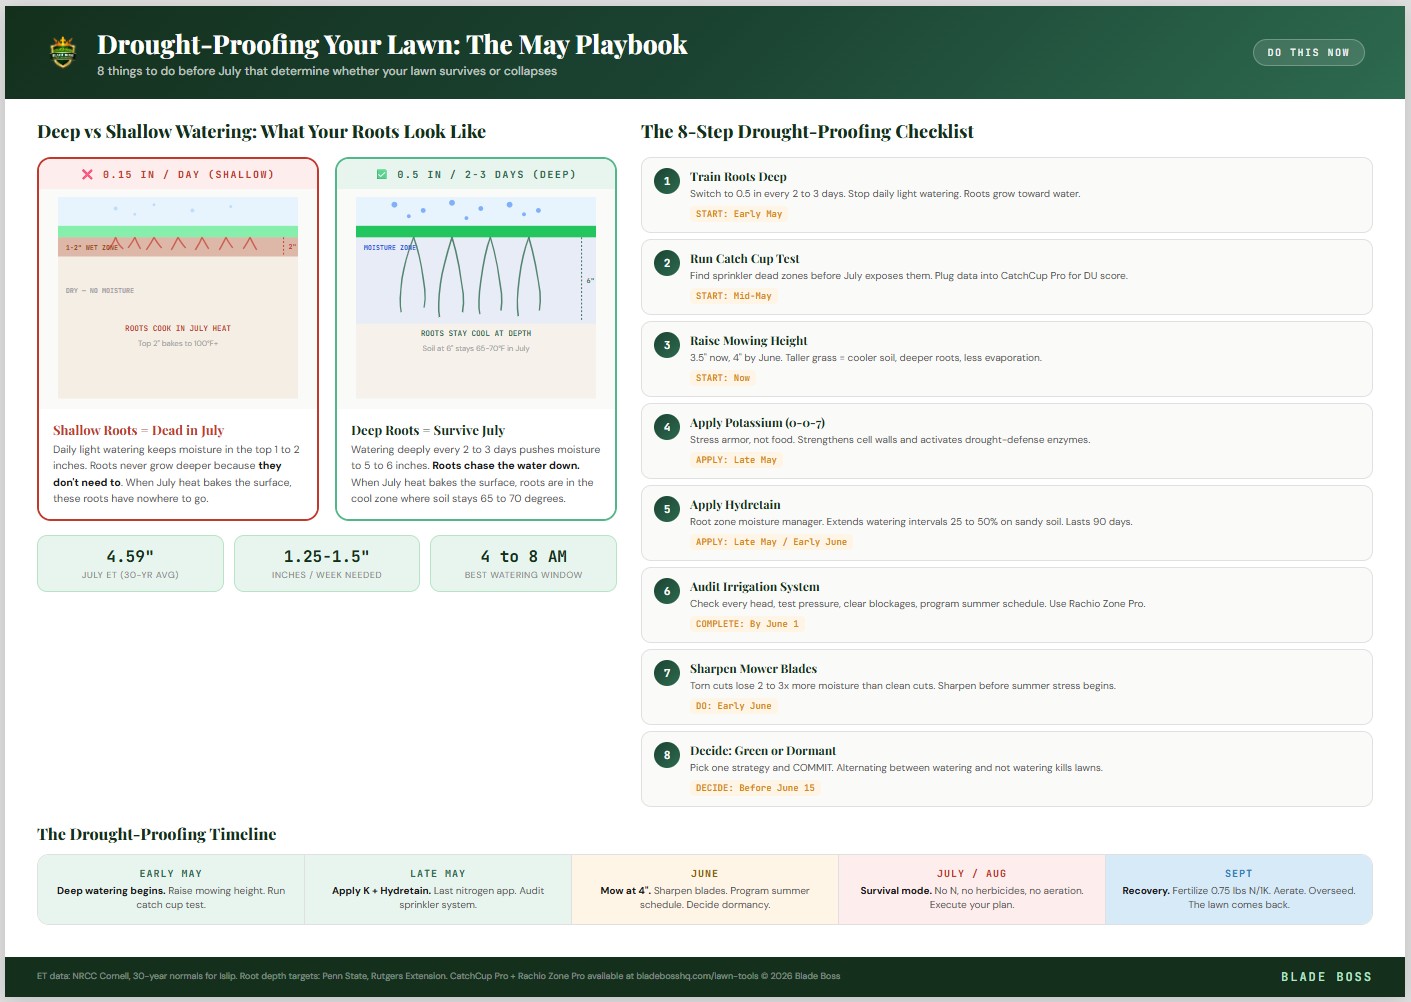
- Build deep roots NOW by switching to deep, infrequent watering (0.5 inches every 2 to 3 days instead of daily light watering).
- Raise mowing height to 3.5 inches in May, 4 inches by June. Taller grass = cooler soil, deeper roots, less evaporation.
- Apply potassium (0-0-7) in late May or early June for stress hardening. Armor, not food.
- Run a catch cup test to find irrigation dead zones before they become dead lawn in July.
- Apply Hydretain on sandy soil to extend watering intervals by 25 to 50%.
- Stop nitrogen by early June. The last N app should be done before sustained heat arrives.
- Sharpen your mower blades so every cut heals fast instead of tearing open moisture-losing wounds.
Why May Is the Real Drought-Proofing Window
Most people start thinking about drought when they see the lawn browning in July. By then it is too late. The plant is already in survival mode, burning stored carbohydrates just to stay alive. It cannot build deeper roots or stronger cell walls while it is fighting heat stress. Everything you do in July is damage control.
May and early June are the window because roots are still actively growing (soil temps are 55 to 70 degrees, the sweet spot for cool-season root development), the plant is producing more energy than it is consuming, and there is still time to train root depth before the soil heats above 75 degrees and root growth slows.
Step 1: Train Your Roots Deep
This is the single most impactful thing you can do. Roots grow toward water. If you water a little bit every day, roots stay in the top 1 to 2 inches because that is where the moisture is. When July heat bakes that top layer dry, those shallow roots have nowhere to go.
Switch to deep, infrequent watering: apply 0.5 inches of water every 2 to 3 days instead of 0.15 inches daily. On Long Island's sandy soil, 0.5 inches penetrates to about 5 to 6 inches before draining below the root zone. Roots chase the water downward over the next 2 to 3 days as the surface dries out. Within 3 to 4 weeks of this pattern, your root system will be measurably deeper.
Push a long screwdriver into the soil 24 hours after watering. It should slide in easily to 5 to 6 inches. If it stops at 2 to 3 inches, your water is not penetrating deep enough. Either increase the run time per zone, or switch to cycle-soak mode (10 minutes on, 30 minutes off, repeat) to let water infiltrate before the next pulse.

Our irrigation guide covers the full catch cup method, watering math, and zone-by-zone scheduling.
Step 2: Run a Catch Cup Test (Find Your Weak Zones)
Most sprinkler systems have gaps. Rotors overlap unevenly, spray heads get blocked by plants, and nozzle wear changes output over time. The zones that get the least water are the zones that brown out first in July. A catch cup test reveals exactly where those weak spots are so you can fix them before they matter.
Set out 6 to 8 cups (tuna cans work too) across each sprinkler zone. Run the zone for 15 minutes. Measure the water depth in each cup. The variation tells you your distribution uniformity (DU). If one cup has 0.4 inches and another has 0.1 inches, you have a coverage gap that will become a brown patch in July. Plug your measurements into the Blade Boss CatchCup Pro calculator and it gives you your exact DU percentage, precipitation rate, and tells you whether your system needs adjustments.
Orbit Catch Cups (12 Pack)
Place across each zone to measure actual sprinkler output and uniformity. Takes 15 minutes per zone. Identifies coverage gaps before they become dead spots in July.
Check PriceRun Your Catch Cup Data Through CatchCup Pro
Enter your cup measurements and the CatchCup Pro calculator gives you your Distribution Uniformity (DU), precipitation rate in inches per hour, and flags zones that need head adjustments. Then feed those numbers directly into Rachio Zone Pro to set perfect runtimes.
Step 3: Raise Your Mowing Height (Gradually)
Taller grass is more drought-resistant. It shades the soil surface (reducing evaporation and keeping soil 10+ degrees cooler), develops deeper roots (more leaf area = more photosynthesis = more energy for root growth), and outcompetes weeds that need sunlight to germinate.
Start raising your deck now. If you are currently cutting at 3 inches, move to 3.5 inches this week and 4 inches by early June. Do not jump from 2.5 to 4 inches in one mow. Increase by half an inch per week so the grass adjusts gradually. By the time heat arrives, your canopy is at full height and the root system has had weeks to respond.
And make sure those blades are sharp. A torn grass blade loses 2 to 3 times more moisture than a clean cut. In summer, that moisture loss compounds across 30+ mowing cycles.
Step 4: Apply Potassium (The Stress Shield)
Potassium does not make your grass grow or turn green. What it does is strengthen cell walls, regulate water movement within the plant, and activate drought-defense enzymes. Think of it as armor, not food. A potassium application in late May or early June gives the plant 4 to 6 weeks to build this armor before the heat arrives.
Use a 0-0-7 product (zero nitrogen, zero phosphorus, all potassium). The Yard Mastery 0-0-7 is the easiest option (also doubles as a prodiamine pre-emergent carrier in spring). For a standalone potassium source, SOP (sulfate of potash) is available at SiteOne or online. Do NOT apply nitrogen this close to summer. Nitrogen forces leaf growth that the plant cannot sustain in heat and increases brown patch disease susceptibility. Our nutrient guide explains the full science of why K is the immune system and N in summer is the enemy.
On Long Island's sandy soils (CEC 3 to 8), potassium leaches fast. A soil test showing adequate K in April may show low K by July without a supplemental application. This is normal for sand. It is not a deficiency in your program. It is the physics of your soil.
Calculate Your Exact K Rate
Enter your lawn size, soil type, and current K level from your soil test. Get the exact pounds of 0-0-7 needed and the spreader setting for your model.
Step 5: Apply Hydretain (The Sandy Soil Game-Changer)
Hydretain is a hygroscopic humectant that lives in your root zone and attracts moisture from the air trapped in soil pore spaces. It condenses that humidity into plant-available water directly at the roots. It does not replace watering, but it extends the interval between waterings by pulling moisture the soil would normally lose to evaporation.
On Long Island's sandy soils where water drains past the root zone in 2 to 3 days, Hydretain addresses the exact limitation that makes our lawns drought-vulnerable. University turfgrass research shows it extends watering intervals by 25 to 50%. One liquid application (via backpack sprayer) lasts approximately 90 days, covering the entire peak stress window from June through August.
Hydretain Root Zone Moisture Manager
Hygroscopic humectant that holds moisture in the root zone. Apply as a liquid in late May or early June. One application covers June through August. Extends watering intervals by 25 to 50% on sandy soil.
Check PriceApply Hydretain in late May or early June, before heat stress begins. Water in immediately with 0.25 inches. The product needs to reach the root zone to work. It activates on its own as the soil dries between waterings. Applying during active drought stress still works, but applying before stress means the product is already in position when the plant needs it.
Step 6: Audit Your Irrigation System
Beyond the catch cup test, May is the time to walk every zone and look for problems that will cost you in July:
- Check every head. Run each zone and walk it. Look for heads that don't pop up, spray into fences or walls, are blocked by grown-in plants, or have broken nozzles.
- Check water pressure. Low pressure means poor throw distance and uneven coverage. Use a pressure gauge at the closest hose bib. Residential systems should run 40 to 60 PSI.
- Clear spray patterns. Trim grass and plants that have grown around heads since last season. A head throwing into a shrub is a head that is not reaching your lawn.
- Adjust head angles. After winter freeze/thaw, heads shift. Make sure rotors cover their full arc and spray heads are aimed at lawn, not sidewalk.
- Check your rain sensor. If you have one, test it. A stuck rain sensor that thinks it is always raining will shut down your system when your lawn needs water most.
- Program your controller. Switch from spring to summer watering schedule by early June. Use your CatchCup Pro precipitation rate to calculate exact run times per zone, or plug everything into Rachio Zone Pro which calculates runtimes for Fixed, Flex Monthly, and Flex Daily schedules automatically. 3 days per week at 0.5 inches per cycle is the target.
Rachio 3 Smart Sprinkler Controller (8 Zone)
Adjusts watering automatically based on local weather data. Skips cycles when it rains, increases when it is hot. Pair it with the Blade Boss Rachio Zone Pro configurator to set exact zone parameters using your measured precipitation rate and DU from the catch cup test. Pays for itself in water savings within 1 to 2 seasons.
Check PriceOne text when sustained temps signal it's time to switch to summer survival mode. No spam, just timing.
No spam. One seasonal alert per application window. Unsubscribe anytime.
Step 7: Check Your Soil Moisture Tool
Stop guessing whether to water. A $15 moisture meter tells you exactly what is happening at root depth (4 to 6 inches) so you can make data-driven decisions. If the probe reads moist at 4 inches, skip the watering cycle. If it reads dry, run the zone. This prevents both over-watering (which drives disease) and under-watering (which kills roots).
XLUX Long Probe Moisture Meter
12-inch probe reaches root depth on any lawn. No batteries needed. Check moisture at 4 to 6 inches before every watering decision. The $15 tool that replaces guessing with data.
Check PriceStep 8: Plan Your Dormancy Decision Now
You have two strategies for July and August. Both work. But you need to decide BEFORE the heat hits and commit fully. Switching mid-summer is what kills lawns.
| Strategy | What You Do | Best For |
|---|---|---|
| Stay Green | Water 1.25 to 1.5 in/week. Monitor for disease. Keep mowing at 4 in. | Homeowners with irrigation systems and time to monitor. |
| Allow Dormancy | Stop irrigation. Grass browns but crowns survive. Apply 0.25 in every 2 to 3 weeks. | Homeowners without irrigation or who want to save water. |
Do NOT water for two weeks, let the lawn go dormant, then water heavily, then stop again. Each cycle of dormancy-to-active-to-dormancy forces the plant to break dormancy, which burns stored energy. Repeated cycles exhaust the crown and can kill the grass permanently. Either water consistently or let it sleep consistently. Our summer stress guide covers both strategies in detail.
The Drought-Proofing Timeline
Start Deep Watering
Switch from daily light watering to 0.5 inches every 2 to 3 days. Roots start growing deeper within 2 to 3 weeks.
Run Catch Cup Test + Audit
Test every sprinkler zone. Fix gaps, clear blocked heads, check pressure. Raise mowing height to 3.5 inches.
Apply K + Hydretain
Potassium (0-0-7) for stress hardening. Hydretain for root zone moisture retention. Last nitrogen application if not already done.
Final Prep
Mowing height to 4 inches. Sharpen blades. Program summer watering schedule (3x/week, early morning). Decide: stay green or allow dormancy.
Transition to Survival
Stop all nitrogen. Stop all herbicides. Your drought-proofing is done. Now execute your summer plan and monitor weekly.
Why Long Island Lawns Need This More Than Anyone
A lawn in Westchester sitting on clay with CEC 15 to 20 holds water for a week between waterings. Your lawn in Suffolk County sits on sand with CEC 3 to 8 and drains every drop in 2 to 3 days. That is not a deficiency in your lawn care. That is the physics of glacial outwash sand. It means every strategy in this guide matters more for you than for someone 30 miles north with better soil.
July ET on Long Island peaks at 4.59 inches per month (30-year NOAA average for Islip). That means your lawn is losing over an inch of water per week just to evaporation and transpiration. On sand that cannot store a reserve, you are replacing that loss in real time or the grass goes dormant. There is no buffer. The sandy soil guide covers the full long-term strategy for building organic matter and CEC over time.
Zone-specific watering times, the catch cup method, and seasonal adjustments for Long Island soils. Print it and post it by your irrigation controller.
See what Blade Boss members get. The Lawn Command Center tracks soil temperature, GDD, heat stress windows, and watering schedules so every decision is data-driven, not a guess.
See Plans →Chris is a Combat Search and Rescue pilot turned airline pilot who built Blade Boss to bring military-grade precision to backyard lawn care. He drought-proofs his Ronkonkoma lawn every May with Hydretain, deep watering, and a potassium application that his neighbors think is fertilizer. It is not. It is armor.
Related Reads
The summer stress survival guide covers the 5 mistakes to avoid once the heat arrives. The irrigation guide dials in your watering math. The nutrient guide explains why potassium is the stress shield and nitrogen in summer is the enemy. And the fertilizer schedule maps all 5 rounds so you know exactly when to stop feeding and start protecting.
Frequently Asked Questions
How do you drought-proof a cool-season lawn?
Drought-proofing starts 6 to 8 weeks before the heat arrives. The key steps are: train roots deep by watering deeply and infrequently (0.5 inches every 2 to 3 days instead of daily), raise mowing height to 4 inches by June, apply potassium (0-0-7) for cell wall strength, run a catch cup test to find irrigation gaps, apply Hydretain root zone moisture manager on sandy soils, stop nitrogen fertilizer by early June, and sharpen mower blades so cuts heal fast. Every step is designed to build the plant's internal reserves and root depth before heat stress depletes them.
How deep should lawn roots be for drought resistance?
Cool-season grass roots should ideally reach 6 inches or deeper for good drought resistance. Tall fescue can root to 6 to 8 inches under ideal conditions, Kentucky bluegrass to 4 to 6 inches, and perennial ryegrass to 4 to 6 inches. On Long Island's sandy soils, roots often stay shallow (2 to 3 inches) because surface watering trains them to stay near the top. Switching to deep, infrequent watering forces roots to grow downward to chase the moisture, which dramatically improves drought survival.
Does Hydretain really work on sandy soil?
Yes. Hydretain is a hygroscopic humectant that attracts moisture from humidity in the soil pore spaces and condenses it into plant-available water at the root level. University turfgrass research has shown it can extend watering intervals by 25 to 50%. On Long Island's sandy soils where water drains through the root zone in 2 to 3 days, Hydretain addresses the exact problem: the soil cannot hold water long enough for roots to use it. One application lasts approximately 90 days.
How much water does a Long Island lawn need in summer?
Based on 30-year NOAA climate data for Long Island, peak evapotranspiration in July is 4.59 inches per month, or about 1.15 inches per week. To keep grass actively growing through summer, you need 1.25 to 1.5 inches per week from irrigation plus rainfall. On sandy soil (CEC 3 to 8), apply this as 0.5 inches every 2 to 3 days rather than 1 inch once per week, because sand cannot hold a full inch at the root zone.
When should I start preparing my lawn for summer drought?
Start 6 to 8 weeks before your area typically hits sustained 85-degree temperatures. On Long Island, that means preparation should begin in early to mid-May. By the time you feel the heat in late June, your root system, mowing height, and watering schedule should already be adjusted. Drought preparation done in July is too late because the plant is already in stress mode and cannot build the reserves or root depth it needs.
Keep Reading
 Lawn Science
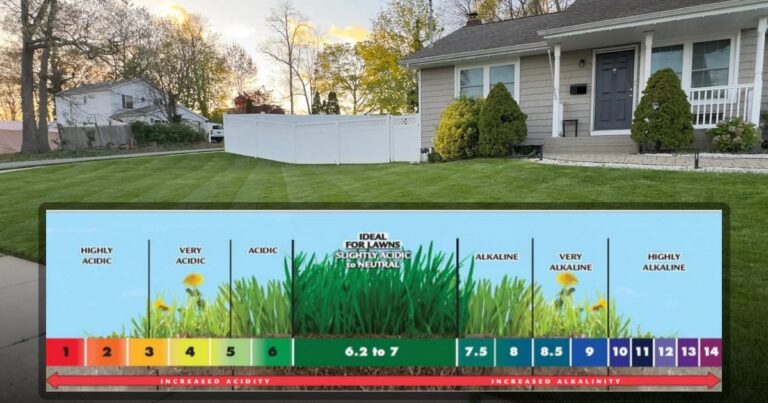
Long Island Soil pH Guide: How to Test and Fix Your Lawn’s Foundation
Most Long Island lawns test between pH 5.9 and 6.2, which is too acidic for peak nutrient uptake....
 Lawn Science
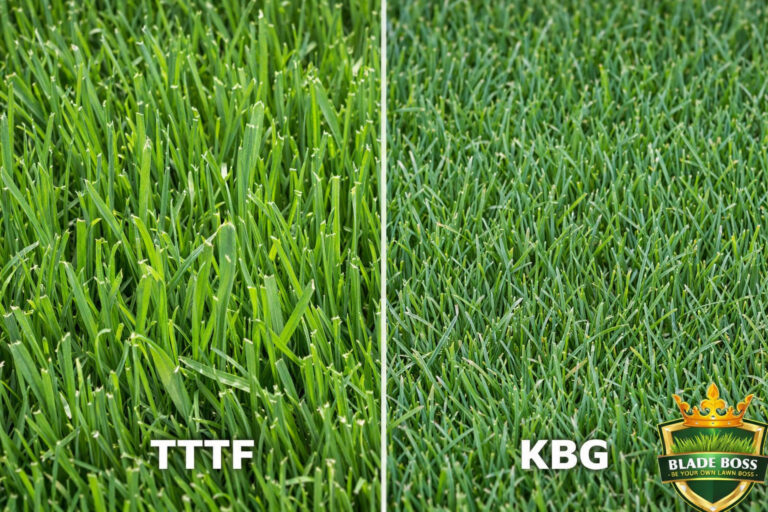
Tall Fescue vs Kentucky Bluegrass: Which Is Best for Long Island?
For Long Island's sandy soil and summer heat, tall fescue wins on drought tolerance and low maintenance. Kentucky...
 Long Island Local
Long Island Grub Control: When to Treat and What to Use
Oriental beetles, not Japanese beetles, are the #1 grub on Long Island. Learn the exact treatment windows, damage...
Level Up Your Lawn Game
20+ pro calculators, satellite lawn mapping, and USDA zone-specific schedules. Built for Long Island and Northeast homeowners.
Create a free account to join the conversation.